Monk
Monk
Summary: Monks dedicate themselves to intense physical and mental training, constantly refining their skills and discipline. By combining martial arts with spiritual power, they strike down evil with powerful close-range attacks.
| Monk | |
|---|---|

|
|
| Job Type: | Second Class |
| Job Level: | 50 |
| Race: | Human |
| Changes At: | Prontera |
| Skills: | 15 |
| Skill Points: | 49 |
| Quest Skills: | 2 |
| Job Bonuses | |
|
STR + 8
AGI + 7
VIT + 6
INT + 2
DEX + 4
LUK + 3
|
|
Overview
Monks believe that true faith is strengthened through both the mind and the body. Through rigorous training, discipline, and determination, they strive to achieve spiritual and physical perfection. Their dedication and strength have earned them both respect and admiration throughout the land.
Combining martial arts with spiritual power, Monks unleash a variety of devastating techniques against their enemies. From swift combo attacks to crushing finishing blows, they overwhelm foes with precise strikes and immense force. Among their many abilities, Guillotine Fist is especially renowned for the tremendous power it delivers in a single attack.
Most Monks focus on offensive combat, maximizing their damage through skills such as Occult Impaction and various Combo techniques. Their powerful close-range abilities and flexible fighting style allow them to adapt to many different challenges.
After reaching Base Level 99 and Job Level 50, Monks can begin the Rebirth process, starting over as a High Novice. By progressing through the transcendent job path and advancing to their second class once again, they can become Champion.
Job Changing
-
Visit Monk Abbey and speak with the Guarding Monk , then enter the warp at Monastery and talk to Sensei Moohae . If you meet the requirements, he will assign you the first trial.
Tip
Alternatively, you can reach the Monk Abbey through the Prontera Church. Enter the room on the right and speak with Priest Praupin Select "What should I do?" followed by "Go to the convent" to be transported directly to the Monk Abbey.
-
Sensei Moohae will assign one of several item collection tasks.
Item Amount Cyfar 5 White Herb 10 Yellow Herb 10 Item Amount Solid Shell 5 Shell 20 Zargon 5 Item Amount Porcupine Quill 5 Cobweb 20 Bug Leg 10 Item Amount Sticky Mucus 5 Earthworm Peeling 10 Green Herb 20 Item Amount Tooth of Bat 10 Bear's Footskin 5 Poison Spore 20 Item Amount Stem 30 Jellopy 5 Worm Peeling 10 Item Amount Yoyo Tail 20 Iron Ore 5 Blue Herb 3 -
Return to Sensei Moohae after gathering the required items. He will direct you to Touha .
-
Touha will have you memorize one of the following item sets:
Memory Trial
I seek the path
of enlightenment.
We monks
shall hold true
to what we believe
and will help protect others
through the teachings
we learn through our lives.
In nomine Patris, et Filii
et Spiritus Sancti.
I commit myself to veritas and aequitas. I will follow my path to enlightenment and purity. I will protect my brothers with my life. Evil shall never be victorious while I breathe. In nomine Patris, et Filii et Spiritus Sancti.And shepherds we shall be, for thee my lord for thee. Power hath descended forth from the hand so our feet may swiftly carry out thy command. And we shall flow a river forth to thee and teeming with souls shall it ever be In nomine Patris, et Filii et Spiritus Sancti. -
Speak with Boohae to choose between the Marathon and Mushroom Collection tests. The Mushroom Collection test is generally recommended, as the Marathon test may require Agility Increase or Concentration Potions to complete comfortably. If needed, you can return to Boohae later to switch to the other test.
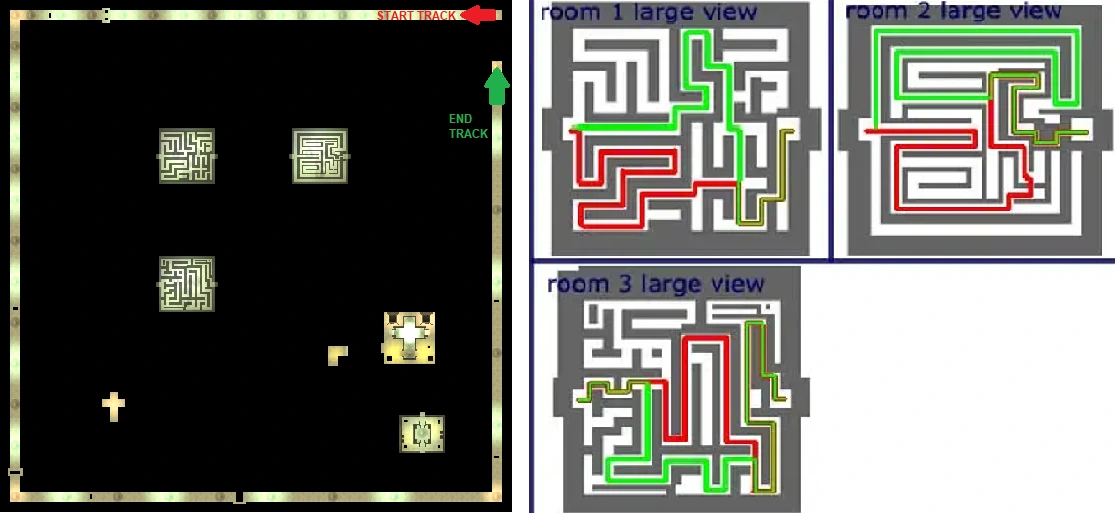
click to enlarge
Left: The Marathon course used in step 6a, including the hidden pitfalls.
Right: The Invisible Maze used in step 7. One of three possible maze layouts will be selected at random.6a. Marathon Test
 This test is lengthy and generally not recommended unless you do not have access to Agility Increase or Concentration Potions.
- If you choose the Marathon test, speak with the Door Keeper Enter the building and talk to Bashu then select "Marathon" to be transported to the testing area.
Tip
The following coordinates can be pasted into the in-game chat to reveal the path to the next portal:
- Complete 10 laps around the course without falling into the pits. Each time you pass through the end portal, one lap is counted. The course forms a large ring with several hidden pitfalls scattered throughout the route. Lowering the camera angle (Ctrl + Shift + Mouse Wheel Up) can make the pits easier to spot from a distance.
- Disconnecting during the test will return you to your save point. Once all 10 laps have been completed, you will automatically be warped out of the testing area. The Marathon test takes approximately 30 minutes to finish with Agility Increase.
- Continue to Step 7.
6b. Mushroom Collection
- If you choose the Mushroom Collection Trial, talk to Hyunmoo Your objective is to collect 30 Gooey Mushrooms or 30 Orange Gooey Mushrooms. The NPC will not inform you that you have gathered enough until you have collected 30 of either type.
- During the test, you will encounter Thief Bugs that can steal your mushrooms and call nearby Thief Bugs for assistance when attacked. However, they are relatively weak for characters at this stage of the quest.
- Mushrooms obtained during the Thief Job Change Quest may also be used. While it is possible to have a prospective Thief gather the mushrooms beforehand, an Acolyte with high Agility and buffs can generally complete this test more quickly. Since attacks deal only 1 damage regardless of weapon, completing the test bare-handed is recommended for maximum ASPD.
7. Speak with Tomoon Tomoon will then send you into an Invisible Maze.
During this test, Zombies and Mummies will spawn throughout the maze. While they should not pose much of a threat, the narrow pathways leave little room to maneuver around them.
You can determine whether a cell is passable by hovering your cursor over it. Walkable cells will display the usual green movement marker, while blocked cells will not. In general, try to follow a straight path from the entrance toward the exit. When multiple routes are available, choose the one closer to the center. Disconnecting during this test will return you to your save point.
Tip
The navigation system can also be used to guide you through the maze. Using will lead you to the exit.
8. After completing the maze, speak with Tomoon once more and drink the Green Potion he provides. Return to Sensei Moohae and complete the Final Oath to become a Monk.
Final Oath
| No. | Question | Answer |
|---|---|---|
| 1 | Do you dedicate the remainder of your life to the pursuit of purity? | Yes. |
| 2 | Will you take advantage of the abilities gained through our training to use for personal benefit? | No. |
| 3 | Will you punish those who are against veritas and aequitas? (Truth and Justice) | Yes. |
| 4 | Will you cooperate with others who have the same goal as yours and sacrifice yourself as a means to an end? | Yes. |
| 5 | Will you assist your comrades by gathering monsters to follow you? | No. |
| 6 | Will you yell and shout the same things over and over again in towns or in fields? | No. |
| 7 | Are you willing to die for others on your monk's path of being a holy executioner? | Yes. |
| 8 | Lastly, make your oath that you will keep these vows. | I vow to keep these oaths. |
9. Once Sensei Moohae has finished his speech, you will officially become a Monk.
Completion Rewards
- Knuckle Duster [3] (Job Level 50)
- Waghnak [3] (Job Level 40-49)
Class Data
Skills
| Skill | Description | Max Level | Type |
|---|---|---|---|
| Increases damage with Bare Hands and Knuckle class weapons. | 10 | Passive | |
| Absorbs certain ammount of SP from a Spirit Sphere. | 1 | Supportive | |
| Temporarily increases caster's Critical rate. | 5 | Supportive | |
| Summons a Spirit Spheres, which can be used to amplify different skill. | 5 | Supportive | |
| Attacks an enemy with a massive psychic impact that will inflict more damage when the enemy has high DEF. | 5 | Physical Melee | |
| Attacks a distant enemy by firing a Spirit Sphere. | 5 | Physical Ranged | |
| Only usable during Fury status, inflicts devastating damage by constuming the caster's remaining SP. | 5 | Physical Melee | |
| Increases FLEE rate. | 5 | Passive | |
| Immobilizes both the caster and an enemy. | 5 | Supportive | |
| Restores additional HP and SP every 10 seconds while sitting. | 5 | Passive | |
| Instantly teleport to a targeted spot if there are no obstacles between the caster and the destination. | 1 | Supportive | |
| Enables a chance of automatically delivering a triple attack in battle. | 10 | Passive | |
| Only usable during Raging Trifecta Blow delay. | 5 | Physical Melee | |
| Only usable during Raging QUadruple Blow delay. | 5 | Physical Melee | |
| The caster recieves damage reduction while decreasing Movement and Attack Speed. | 5 | Supportive |


Quest Skills
| Skill | Description | Levels | Type | Job Level Requirement | Quest |
|---|---|---|---|---|---|
| Transfers one Spirit Sphere to a targeted party member. | 1 | Supportive | 40 | Yes | |
| Strikes an enemy with the palm to inflict 600% damage and push away enemies near the target by 2 cells with a 70% chance of causing Stun status on them. | 1 | Physical Melee | 40 | Yes |

Job Bonuses
| Stat | + 1 | + 2 | + 3 | + 4 | + 5 | + 6 | + 7 | + 8 |
|---|---|---|---|---|---|---|---|---|
| STR | 1 | 2 | 12 | 13 | 26 | 27 | 49 | 50 |
| AGI | 5 | 10 | 18 | 21 | 23 | 35 | 44 | - |
| VIT | 7 | 20 | 25 | 33 | 41 | 46 | - | - |
| INT | 16 | 38 | - | - | - | - | - | - |
| DEX | 4 | 22 | 30 | 43 | - | - | - | - |
| LUK | 15 | 32 | 40 | - | - | - | - | - |